beginner’s guide to google search console

Google has several tools for producing data on your website’s performance. They’re free to use for just about anyone with a website. Nowadays, they’re all packaged together under the umbrella of Google Search Console.
This guide seeks to make the case for using Google Search Console as your primary tool for tracking web performance and teach you how to use it and make the most of it.
Google Search Console is a powerful tool that is too good to ignore. Here’s how you can harness that power for your website.
Why Use Google Search Console?

Google Search Console is like an all-in-one analytics tool that can be used for just about anything. It can track performance, give valuable insights, show crawl errors that need to be fixed, and so on. It’s an analytics tool and a diagnostics tool in one tight and refined package.
It had previously been known as Google Webmaster Tools for almost a decade, but was then rebranded as Google Search Console in 2015. Along with that rebranding were improvements that came out of beta in January 2018.
If you’ve previously used Webmaster Tools or Search Console before the new features were added, you may want to take this guide as a refresher course.
With all the algorithm updates and other changes implemented in Google over the years, it’s worth knowing how this tool can be used according to how things are nowadays.
Adding a Site
If you haven’t added your website to Google Search Console yet, you’ll have to do some procedures to add and verify your site so it can be tracked in real time.
The verification process is for proving that you truly are the owner of the website as you would want the mostly confidential information reported by Search Console to be kept to yourself. Also, you need to do something to complete the verification.
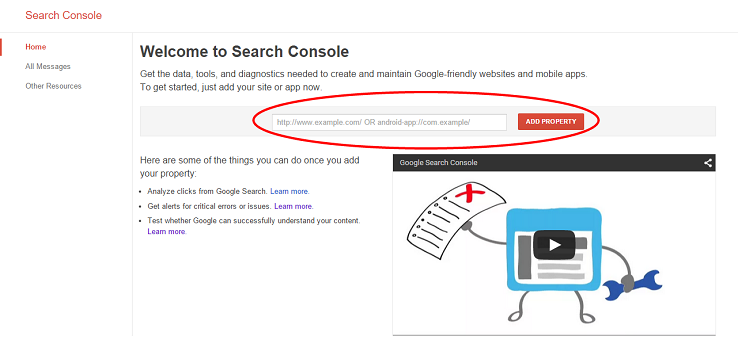
Log into your Search Console account, which you should be able to get easily if you have a Google account. You then find the red button that says “Add Property” and the text box next to it. Enter your website’s URL in the text box, then click on the “Add Property” button.
Now to verify your website. It offers you a few different ways to go about it, so you can choose what best suits your current skill level and understanding. If that sounds complicated to you right now, don’t worry since we’ll clear it up for you here.
Verifying a Site
You can insert an HTML tag, which is good if you know how to edit the code of your site. Copy the indicated tag and paste it on the <head> section of your site’s HTML. You can then click the “Verify” button on Search Console to proceed with verification and it should detect the HTML tag if you put it in right.
You can upload an HTML file to the indicated directory of your site, which is a good option if you’re familiar with uploading files through FTP.
Another option would be to verify via domain name provider. The advantage of this is if you happen to have subdomains, they’ll also be verified. This is a great option if you happen to own a large website with lots of subdomains.
If your domain name provider is not among those listed, you’ll have to choose “Other” and follow the instructions to create a DNS TXT record for your provider.
If that doesn’t work, you’ll have to create a CNAME record instead. Suffice to say, it’ll be more complicated if you have to do that.
You can also add a Google Analytics code, which is similar to adding an HTML tag as you have to paste it on the <head> section of your HTML as well. Once you verified through that method, you must not remove the GA code from your site, lest it become unverified.
There’s also Google Tag Manager, which is perhaps the easiest way to go about this process. You do need to make sure the aright files on your site have “View, Edit, and Manage” permissions enabled for this to work.
This option inserts a GTM code at the end of your site’s <body> section, which you should check to make sure it’s there. You then click on “Verify” once you know it’s there.
If you happen to have already linked your site to Google Analytics, then you can just link your Analytics account to Search Console by going to the Search Console dashboard, clicking on the gear icon on the top right, and then clicking on “Google Analytics Property.”
You’ll see a list of Google Analytics accounts associated with your Google account. Choose the GA account you want to use and then click “Save.” After that, it’s linked and you’re good to go.
Adding a Sitemap
Even if you do have your site on Search Console, it may not be entirely there. It may have lots of individual posts and pages that may not all be linked. That’s where sitemaps come in.
A sitemap is an XML file that contains information on how your site is organized. It helps search engines and web crawlers see everything in your site, including the metadata, image and video content, and how often your site is updated.
Submitting your sitemap to Google Search Console lets you truly get all the information you need from it. While this is not a mandatory step to use GSC, it’s still better to do this step in order to really get the most out of it.
On your Search Console dashboard, select your site and look under the “Crawl” menu. Click on the “Sitemaps” option and then click “Add/Test Sitemap” on the upper right. Enter “system/feeds/sitemap” in the text box and then click on “Submit Sitemap.”
That should do the trick. Google Search Console should then crawl through your site and track the performance of all the individual pages you have.
Checking Robots.txt
If you want to take it even further, you can use a robots.txt file, which tells the search engine crawlers what parts of your site you want and don’t want indexed. It can be useful if there are certain pages you don’t want to appear on Google for whatever reason. This can be done through the Robots Exclusion Standard.
You can check your robots.txt file by going into Search Console and select that particular site. Click on the “Crawl” menu on the left side and then click on “robots.txt Tester.” This tool lets you see your robots.txt file, edit it, and be alerted of any errors in it.
You may also choose from a list of Google user agents (names for robots and crawlers) and enter a URL and run a test on it to see if it’s recognized by that crawler to see if it’s working as intended.
If you edit robots.txt through the tester, changes won’t be immediately reflected on the robots.txt file on your site. Click on the “Submit” button on the lower right. If that doesn’t work as intended, you can choose to download the updated robots.txt file so you can upload it to your site’s root directory (yourwebsite.com/robots.txt).
You can then click on the “Verify live version” option on the tester and see if you have the right file on your site. If it’s all good, click on “Submit live version” to let Google know about it. Your site will then be crawled and the changes should be implemented.
Fetch as Google and Submit to Index
There may be times when your website undergoes significant changes. The pages that Google may have indexed from your site may not be updated yet. If you want those changes to appear on search results as soon as possible, then you may want to submit it manually.
Go to the Search Console dashboard and select the page you intend to submit. Make sure you check whether you need to use the “www” prefix for that URL or not. You then go to the “Crawl” menu and click on “Fetch as Google.”
You can then enter the URL of the page you wish to be fetched in the middle box. Leave the middle box blank if you want to fetch the entire website (due to site-wide update or overhaul). Click on “Fetch and Render” and wait a few minutes for the process to finish.
You should then get a “Submit to Index” button at the bottom of the results listing. You can choose either “Crawl Only This URL” to index that specific page or “Crawl This URL and Its Direct Links” to index the entire site.
It may take a few days for the changes to appear in Google search results, but your patience will be rewarded.
Tracking Site Errors
Run a website long enough and you’ll have something go wrong with it. However, most of those errors that tend to pop up remain undetected for a long time. If you want to stay on top of your site, then you may want to have something notify you whenever something goes wrong.
Google Search Console can be made to diagnose what those errors are and immediately notify you when they first pop up.
Click on “Crawl Errors” on the “Crawl” menu to see whatever site or URL errors found by Google bots when they indexed your site. URL errors are shown at the bottom, and you can click on one to get a description of what it is and other details.
You can then address these errors to either notify whoever is responsible for correcting them or fix them yourself.
Comments
Leave a Reply
You must be logged in to post a comment.
First off I want to say awesome blog! I had a quick question which
I’d like to ask if you do not mind. I was interested to knokw how you center yourself and clear your mind prior to
writing. I have had trouble clearing mmy thoughts in gtting my ideas oout there.
I do take pleasure in writing however it just seems like the first 10 to 15 minutes tend to be
wasted simply juust trying to figure out how too begin.
Any ideas or hints? Thanks!
Hello there! This is my first visit to your blog! We are a team of volunteers
and starting a new project in a community in the same
niche. Your blog provided us valuable information to work on. You have done a outstanding
job!
Awesome blog! Do you have any recommendations for aspiring writers?
I’m hoping to start my own blog soon but I’m a little lost on everything.
Would you recommend starting with a free platform like WordPress or go for a paid option? There are so many choices out there that I’m completely confused
.. Any recommendations? Thanks a lot!
That is a great tip especially to those new to the blogosphere.
Simple but very precise info… Appreciate your sharing this one.
A must read post!
Thanks for finally talking about >Beginners Guide to
Google Search Console – Lion Eye Creative <Loved it!
With havin so much content do you ever run into any issues of plagorism or copyright violation? My site has a lot of unique content
I’ve either authored myself or outsourced but it seems a lot of it is
popping it up all over the web without my authorization. Do you know any ways to help prevent
content from being ripped off? I’d truly appreciate
it.